Back in the days of the much-missed Sparkfun Autonomous Vehicle Competition (2009-2018), I and other team members did very well with GPS-guided rovers based on the ArduRover software, which was a spin-off from our drone work. Although we won a lot, there was a lot of luck and randomness to it, too, mostly because GPS was not very precise and positions would drift over the course of the day.
Now that GPS and other other sensors used by ArduPilot have improved, as has the codebase itself, I thought I’d come back to it and see how much better I could get a rover to perform with all the latest, greatest stuff.
The answer is: better! Here’s a how-to.
For this experiment, I used a rover with a Pixhawk 4 autopilot, a Reach RTK M+ rover GPS (on the car) and RS+ base station. This is pretty expensive gear (more than $1,000 for the RTK combo alone) so I don’t expect others to be able to duplicate this (I borrowed the gear from work). However, you don’t actually need the expensive base station — you can use the $265 M+ rover GPS by itself, using Internet-based corrections instead of a local base. There are also cheaper solutions, such as the $600 Here+ base/rover combo or just a $125 Here 3 using Internet-based corrections.
The promise of RTK GPS is that by using a pair of high-quality GPSs, one stationary in a known spot and the other moving on the car, you can detect the atmospheric disturbances that lead to GPS drift on the stationary one (since any apparent movement is clearly noise) and then transmit the necessary corrections to the nearby moving GPS, so it can correct itself. The closer the stationary GPS is to the moving one, the more accurate the RTK solution. So my base station right on the track was perfect, but if you use Internet correction sources and are either near the coasts or farming country (farms use RTK GPS for automated agricultural equipment), you should be able to find a correction source within about 10-20km.
If this works, it should avoid the biggest problem with just using the GPS on the car, which is drift. We often found at the Sparkfun AVC that a waypoint mission around the course that worked great in the morning was several meters off in the afternoon because it was using different GPS satellites. So repeatability was a real issue.
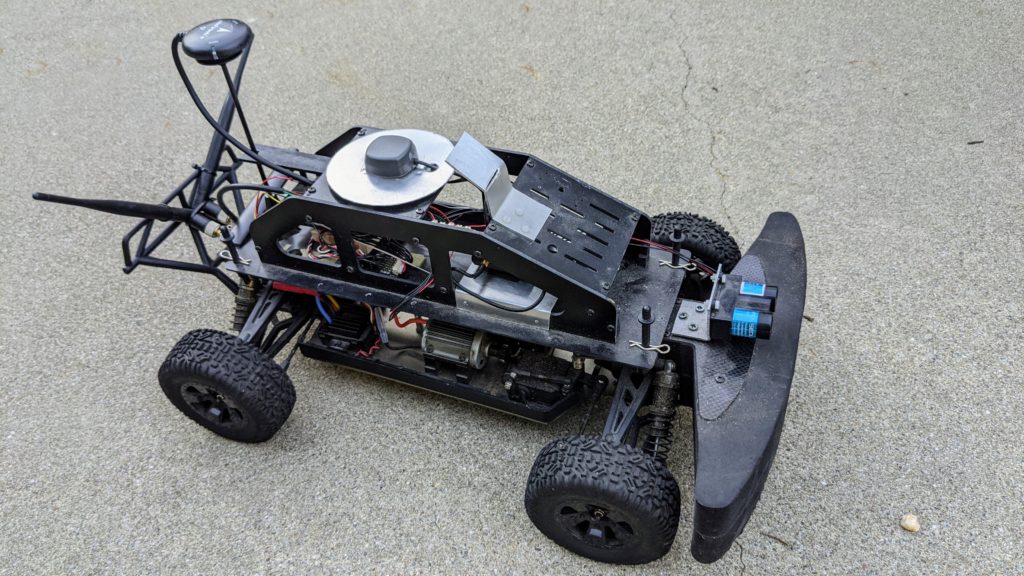
My rover is a standard 1/10th scale RC chassis with a brushed motor and a big-ass foam bumper on the front (trust me, you’ll need a bumper). It honestly doesn’t matter which one you use; even 1/16th can work. Don’t bother to get one with a RC radio, since you’ll want more channels than a standard car radio provides (you use the extra channels to do things like switch modes and record waypoints). Something like this, with this radio (you’ll need CPPM output on the RC receiver), would be fine. I tend to use 2S (7.4v) LiPo batteries so the car doesn’t go too fast (that’s the same reason for using a brushed rather than brushless motor, although either can work). Just make sure that it’s got a proper separate steering servo and ESC; none of those cheap toy integrated deals.
A couple things I added that are useful:
- It’s hard to get the standard 3DR telemetry radios to work well at ground level. So I use the long-range RF900D+ radios instead. Those are pretty expensive, so you will probably want to use the cheaper and still very good 500mw Holybro radios (which are designed to work with the Pixhawk 4) instead.
- I cut out an aluminum circle to put under the Reach RTK GPS receiver, which was recommended. You can also buy those pre-made from Sparkfun.
- You’ll notice a two-barrel sensor at the front of the car. That’s a Lidar-Lite range sensor, which I’ll eventually use for obstacle avoidance
The first task was to set it up, which was not easy.
Setting up the RTK
First, you have to set up the RTK pair. In the case of the Reach RTK, both base and rover (which is the name for the GPS module that moves) can connect via wifi, either to an existing network or to one that they set up themselves. You can either use a web browser or a mobile app to set them up, update the firmware if necessary and monitor their performance. A few things to keep in mind, along with following the instructions:
- You do have to tell the base where it is (enter lat/lon), or set it to sample its own position for 2 minutes (use Single mode, since it isn’t getting corrections from anywhere else). I usual use the sampling method, since Google maps on my phone is not as accurate.
- On the rover, select “Kinematic mode” and tell it to accept horizontal motion of 5 m/s
- On the rover, set it to stream its position over Serial using NMEA format at 38kbs.
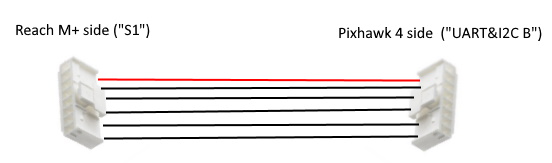
- If you’re using a Pixhawk 4 like me (and perhaps other Pixhawk-based autopilots), you’ll have to make a custom cable, since for some dumb reason Reach and Pixhawk use Serial connector pinouts that are mirrored. On Pixhawk, V+ is the red wire on the left of the connector, while on the M+ it’s on the right. Super annoying. Basically just take a spare six-pin cable for the Reach and a spare for the Pixhawk (they’re mirrored), cut them and resolder the wires (use heat shrink tubing on each) in the same order counting from the red wire. Like this:
Setting up ArduRover
In my setup, I’m using both the standard GPS that comes with the Pixhawk 4 as well as the Reach RTK GPS.
So we’ll start by setting up ArduRover so it works with the standard Pixhawk GPS, and then we’ll add the second RTK GPS. There are a couple tricks to setting up ArduRover, which you should keep in mind in addition to the instructions:
After you do the regular setup, there are a lot of tuning instructions. This can be a bit overwhelming, but these are the ones that are most important:
- First, your steering may be reversed. There are actually two steering modes: manual and auto. First, start with auto mode. Create a mission in Mission Planner, arm and put your rover in auto mode. If it steers towards the first waypoint, great; if it steers away, that means that your output is reversed and change the Servo 1 parameter to Reversed. Once you’ve got that sorted, do the same thing for Manual Mode: if moving your right stick to the right makes the car steer to the right, great; if not, change the RC1 parameter to Reversed.
- Once you’ve got that right, you can focus on getting the rover to track the course as well as possible. There is a page on doing this, but three parameters that are good to start with are these:
- Steering P (proportional) value. The default is pretty low. Try raising it to 0.8 or 0.9. If your rover zig-zags fast when it’s supposed to be going straight, you’ve gone too far. Dial it back a bit
- Tune the L1 controller. I find that it’s too conservative out of the box. I use a NAVL1_PERIOD of 6 (vs default 10) and a NAVL1_DAMPING of .90 (vs default 0.75) on my rover.
Adding the second RTK GPS
Once your rover is running well with the built-in GPS, you can add the second RTK one. Once you plug it into the second UART port, you can enable it by setting the following parameters:
- GPS2_TYPE2 to 5 (auto)
- GPS_BLEND_MASK to 1 (just horizontal)
- GPS_BLEND_TC to 5.0s (quick averaging)
- GPS_AUTO_SWITCH to 2 (blend)
- SERIAL4_BAUD to 38 (38,400 bps)
- SERIAL4_PROTOCAL to 5 (GPS)
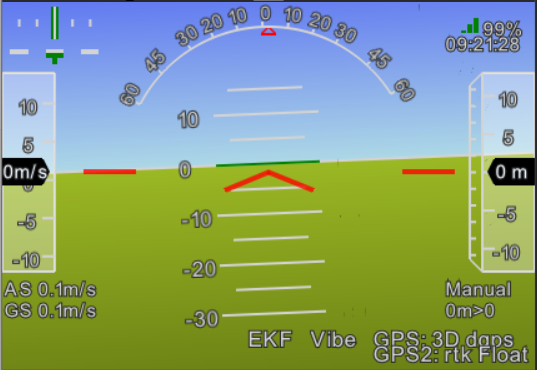
Once you’ve set all those, reboot your autopilot. If you’re outside, when you restart and give the GPSs time to settle, you should see both listed on the Mission Planner HUD. (Note: it’s important to do all this testing outside. If your RTK can’t see satellites, it won’t stream a solution and you won’t see a second GPS in the Mission Planner.)
When it’s working, you should see this: two GPSs shown in the HUD (it will say “Fixed” or “Float” depending on how good your RTK solution is at any given moment):
We’re going to “blend” the RTK and the regular GPS. Why not just use RTK, which should be more accurate? Because sometimes it totally glitches out and shows a position many meters away, especially when you go under trees. So we use the less accurate but more reliable regular GPS to “smooth out” the GPS, which dampens the glitches while still allowing the higher precision (usually) RTK to dominate. The above parameters work pretty well for me.
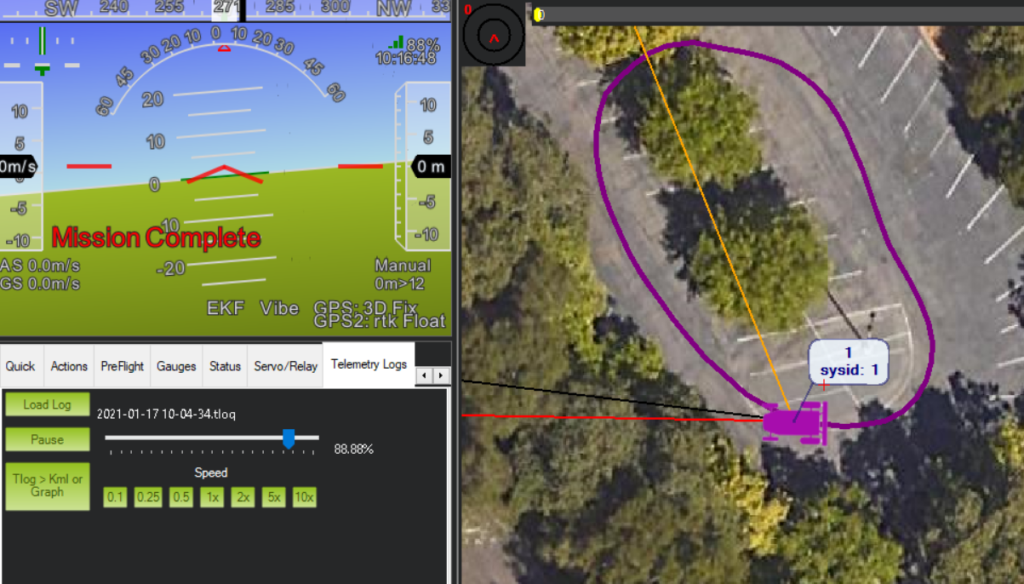
Here’s a replay of the log of one run at 5m/s, which is pretty much perfect. If you want to go even faster, you’ll need to tune it a bit more, but this is quite promising.
So, the final question is: is RTK worth it? I think, on balance, the answer is no. New regular GNSS GPSs using the Ublox M8 and M9 chip sets (I like the MRo range) are getting much better and there are more satellite constellations for them to see. $1,000 and a harder setup is a lot of money and hassle for slightly better performance. So what’s RTK good for? Mostly for industrial rovers that need to be in an exact position, such a agricultural and construction machinery. For DIY Robocar racing, I think you’d be better off with regular GPS.
A nice project presentation Chris. Well documented allowing for easy duplication.
I won the Sparkfun AVC Peloton Class with a 3DR APM and GPS combo in 2013 and came in third in 2014 because of a failed start in the second heat. I was running a Pixhawk 1 and dual GPSs in the 2014 AVC, but was up against some vehicles that should have been in the high dollar class (>$1,000). When my 3DR Pixhawk 1 guided Traxxas 4WD Slash completed the third and final heat in the 2014 AVC coming in first, there was nobody else’s car in sight.
What’s the RC model ur using?